Monday, August 29, 2011

T Bee's Book Club


Several months back, while squandering time searching Amazon.com, I saw an advance publication notice for Kim Flottum's new book, Better Bee Keeping: The Ultimate Guide to Keeping Stronger Colonies and Healthier, More Productive Bees. Sadly, when someone includes words like "Ultimate", "Extreme" or "Ranch Flavored" in the name of their product, I'm drawn toward it like a moth to a flame. Further, since its subject would fit so well into my beekeeping library, I added Mr. Flottum's yet to be published work to my calendar so I could buy it as soon as it came out.
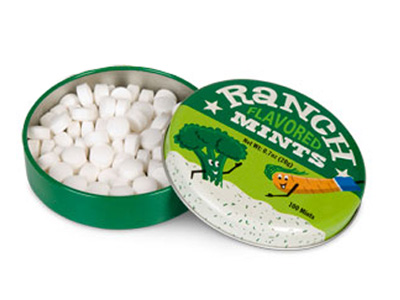
It's wrong, but I'd probably buy them...
For those of you who don't know, Kim Flottum has been the editor of Bee Culture Magazine for over 25 years. In addition to his latest book, he wrote The Backyard Beekeeper and The Backyard Beekeeper's Honey Handbook. He also has a electronic publication called Catch the Buzz that passes along the latest beekeeping news releases and articles via email a few times a week. So it's safe to say that when it comes to honey bees, Kim Knows his stuff.
Kim Flottum
On with the book review. I picked up my ultimate, extreme, to bad it wasn't ranch flavored copy of Better Beekeeping and got sucked in immediately. The reason being is that despite the generic title and vague endorsements, the book is written for those interested in the business of beekeeping. And since I'm in the process of launching my own little honey operation next spring, I was eager to see what ideas the book could add to my business plan. A lot was touched on, complete with tons of photos, but I'll focus on what my main takeaways were.


Time vs. Money

When it comes to building a beekeeping business, Mr. Flottum suggests approaching it with  the mindset of investing your capital in ways that allow for the best use of your time. I've learned the hard way how quickly I can get bogged down in the minutea of getting a business up and running, only to find out after the fact that outsourcing a lot of the details, even if I drew pride and satisfaction from them, would have been a more profitable use of my time. Further, taking on those non value added aspects become a bottleneck for growth. In beekeeping, it feels like time well spent to assemble hive bodies, supers and a few score of frames and foundation to run a couple of hives in the back yard. One may even call it fun. But when you're adding ten nucs, a half dozen packages and looking to do several splits on the twenty or so colonies you hope make it through winter, all those details can turn from satisfying joy to a loathsome chore. However, where reality and practicality cross paths, it can be hard to justify some expenditures. For instance, whereas I may strongly consider the added cost of buying pre-assembled frames and beeswax coated plastic foundation to free up time, I can't justify the investment in a chain uncapper. But I will say that Kim's philosophy reminds me that when entrepreneurial efforts consume all of your spare time, they start taking time away from other things you need or want to do. So it would seem important keep a sharp eye on how time is best spent.

Renting Land

Keeping bees can be a downright hassle, particularly if you live in an urban or suburban environment. Bees drinking out of neighborhood swimming pools, flying around flood lights at night, invading aluminum can recycle bins, meddlesome crumb snatchers hell bent on aggravating the bees with their water cannon do hickeys, overuse of pesticides and herbicides all make it tough to be both a good neighbor and a good beekeeper. So many of us go in search of bee yards away from all that stuff. And if we're lucky enough to find a secluded area not too far from home that doesn't cost us any money, we hit the trifecta. If there are good nectar and pollen sources close by or if there is a convenient water source, that's just icing on the cake. We're just happy to get to keep bees without being hassled, but more often than not end up with the bee yards we can get instead of the bee yards we want. Kim suggests seeking out the bee yards we want and approaching the owners about renting the land from them, maintaining that the increased production and decreased frustration yielded by the "perfect spot" will justify the cost. I think he's got a point and decided to pursue it. I've got several hives on a piece of property I own. It's a good area: secluded, lots of wildflowers, a few ponds around. However, the entire site is covered in pine trees, which provide too much shade; particularly when it comes to controlling small hive beetles. The piece of land that borders mine is a 20 acre field of broom straw that gets bush hogged once a year. So I sent the owner a letter expressing an interest in renting it. With that kind of acreage, I can move my hives out in the sun, have the land plowed and planted with what whatever nectar sources I want and have plenty of room to expand my number of colonies. For the owner, they don't have to maintain the field anymore and they get paid. Hopefully, they see it as a win/win too. Stay tuned...

Queen Rearing

At our state beekeepers meeting this summer the overarching theme was queen rearing. Seminars and short courses on the subject were plentiful and well attended. No doubt, there's a big push for beekeepers to make raising queens part of their normal beekeeping tool kit, and in my opinion, this subject was given more detail than other topics in the book. Don't get me wrong. You won't be an expert on raising queens after reading this book, but you'll know enough about it to realize that it is far from easy. Much like settling for the land we can get, Kim purports we often settle for the queens we can get. Quoting a long time friend of his he theorizes that in a purchase of 10 queens, 2 will be dead or immediately superseded, 2 will produce progeny with above average honey yields while the other 6 produce progeny with an average honey yield. In other words, a normal bell curve: 20% outstanding; 20% below average; and the majority, so-so.

Only queen I've ever "raised". She's a great one, but
it appears it was dumb luck.
According to Kim, by raising your own queens and letting them spend about three weeks in a mating nuc to evaluate the brood pattern, you can make better queens (the queens you want) rather than settle for mass produced queens (the queens you can get). But for me, the book's focus on successful queen rearing felt like it was aimed at the large commercial operation. For instance, the concepts of investing in expensive breeder queens or instrumental insemination devices don't really fit in with making queens on a smaller scale. Further, the whole discussion took me back to the time versus money conflict, making it seem that finding a queen producer that consistently raises queens on the upper end of Kim's bell curve is a wiser use of my time and money; at least in the short run.

Conclusion

If you want to learn how to start beekeeping, Better Beekeeping isn't for you. However, if you're looking to start or expand your beekeeping business, this book would be worth buying. Although it isn't a detailed manual, it does give you a plethora of subjects on which further research may be beneficial to your business ventures.


If you'd like to be notified of updates to this blog, please email me at beeswax@teezbees.com. I promise your email address will not be shared with anyone.

 If you're interested in learning more about beekeeping, join a local beekeepers association as well as your state's beekeepers association. Explore your state's master beekeeper program if they have one. The following links can get you started:


South Carolina

Georgia

North Carolina

Monday, July 18, 2011

Four Splits and a Cup of Sugar

I got this e-mail last week from someone I'd never met. The title was, "Splitting Hives and Introducing New Queens Exercise" and was from Ralph "Buddy" May, a local Journeyman Beekeeper and owner of May Farms, LLC. Buddy was planning on doing some hive splits and introducing new queens and was willing to share with anyone interested. I'd just done a couple of splits of my own with mixed results and thought it would be a great idea to go observe someone with more experience, so I made plans to attend.

6 new queens from Gardner Apiaries


I made the high speed pilgrimage from work to Buddy's bee yard, making it there just in time to begin. We were going to split one colony comprised of two deep hive bodies into four 5-frame nucs. The hive in question was a poor performer with minimal honey production, so the plan was to pinch the old queen and put new queens in the 4 nucs. I'd always looked at splitting hives as a way to manage strong hives in order to increase the number of colonies I had, but I never really gave it much thought as a way to "reset" a poorly performing hive. However, this makes a lot of sense and I look forward to implementing this strategy in the near future.

Donor hive. Notice the two (empty) nucs on each side.
After a generous amount of smoke, Buddy set about distributing the frames in the donor hive into the empty nucs, making sure to position brood frames in the center and honey frames in the outer positions. He utilized screened bottom boards and screened inner covers. He also screened the entrance in order to keep the foragers from leaving and returning to the donor hive since he intended to leave the nucs in the same bee yard he split them from.

Puff, puff, puff
Honey super on top of donor hive
Brood frame from donor hive

After the frames were distributed among the nucs, a pollen patty was added to each nuc as well as a hive top feeder with a couple of quarts of 1:1 sugar syrup to reduce stress on the new colonies. Buddy decided to leave the nucs queenless for a day before adding the new queens. Further, since the queen from the donor hive, which was to be killed, was not located during the split, Buddy planned on going back through each nuc the next day to locate the queen. For requeening, Buddy uses a device called a queen ring, which fits between the nuc body and inner cover, allowing for enough space to insert the queen cage on top of the frames for the new queen's release. I've always introduced queens by suspending the cage on an empty frame, so I'd never seen a queen ring used, but I think this is a great idea.

Queen ring
After the nucs were done, Buddy showed the group how to do a "sugar roll" for detecting varroa mites. I'd heard of a similar technique called an "ether roll" whereby bees were collected in a jar and starter fluid (ether) was sprayed inside and the bees rolled around to dislodge the mites. The ether roll kills the bees while the sugar roll doesn't. To perform the sugar roll, a pint mason jar was filled about 1/4 with powdered sugar. The lid for the jar was replaced with a round piece of #8 hardware cloth and secured with the metal jar band. A sampling of bees was scooped up into the jar and the lid secured. Then the bees were rolled around in the sugar, which caused the mites to fall off of the bees in the jar.
Sugar roll
After the bees were rolled around a little, the jar was shaken out through the hardware cloth into a pan of water allowing the sugar to dissolve and the mites to be revealed. This is a great way to assess the level of varroa infestation to determine if the treatment threshold has been reached without killing a bunch of bees.
Shaking the sugar, and the mites, out.
It was quite an enjoyable evening and I really appreciated Buddy taking time to share his experiences with the group. Hopefully, he'll be doing some more hands on demonstrations in the near future.


If you'd like to be notified of updates to this blog, please email me at beeswax@teezbees.com. I promise your email address will not be shared with anyone.

 If you're interested in learning more about beekeeping, join a local beekeepers association as well as your state's beekeepers association. Explore your state's master beekeeper program if they have one. The following links can get you started:


South Carolina

Georgia

North Carolina

Friday, April 29, 2011

Busy With a Capital BEE

I've been busier than a one legged man in a a** kicking contest lately. In the last few weeks, I've traveled to Athens, Georgia to pick up 4 nucs from Jennifer Berry, then to Carthage, Tennessee to get a couple of nucs from Bee Weaver Apiaries, installed 3 packages in some new hives, split one hive, requeened another hive, mixed up and fed about 15 gallons of sugar syrup and put together a whole bunch of equipment. So how did it all go?

Nucs from Jennifer Berry
I couldn't be happier with this purchase. I only live about 2 hours from Athens, so the location is about as good as I could hope for. Further, Jennifer allowed me to bring the hive components down about a month early and she added 5 of her frames to each one a few weeks before I came to pick them up. So, the bees had already started drawing comb on the 5 frames of foundation I supplied. This was a big bonus. Once I got a chance to inspect them, I found a very nice brood pattern with lots of capped brood and lots of extremely gentle bees. They should be ready for a super in the next week or so. I'm definitely planning on ordering more nucs from Jennifer for next year.

A Berry's Bees "Peachy Queen"

Lots of capped brood underneath all these bees...

nom, nom, nom...

Package Bees
Last year, I worked out a deal with a friend of a friend to let me put some hives on his property which consists of a few acres of blueberries and another 60 acres of all sorts of good wildflower nectar sources like clover, vetch and blackberries. And best of all, he is vehemently against the use of pesticides and herbicides. In addition to my hives, he wanted to start some hives for his family if I'd be willing to help him get them started and share some of what I know. Of course, I was all too happy to oblige. It was way too late to order nucs, so I set about trying to find a source for some packages. Fortunately, a couple of members from my local beekeeping association worked out an arrangement with H&R Apiaries in Jessup, Georgia and I was able to order 3 packages through them. The members were able to go down to H&R to pick up a trailer load full of packages in the morning and bring them back to a local pick up site the same day. So by the time I picked up the three packages I ordered, the bees had been out of a hive less than 24 hours. I installed them by removing 5 frames from the hive body and placing the package in the open space to let the bees climb out on their own rather than dumping them out. When I pulled the empty packages out the next day, I had less than a 1/3 cup of dead bees between all three packages. I found the bees to be extremely gentle and started drawing out comb pretty quickly. The club members intend to do this again next year, so I'll probably get a few more next year.

Bzzzzzzzzzzzzzz

Nucs from Beeweaver
Back in the late 90's after I got out of college, I bought a few packages of Buckfast bees from R Weaver Apiaries in Navasota, Texas before Binford Weaver's family split off and started Beeweaver Apiaries. I liked them, but I felt that the long mailing from Texas to South Carolina was too stressful on the bees. So, when I saw that Beeweaver was doing a drop off program where they trucked packages and nucs from their location to various drop of sites across the country, I decided to give them a shot and pick up a couple of nucs from the closest drop site, which was in Tennessee. When I told people I was getting some nucs from Texas, warnings of the bees being Africanized were abundant. Fortunately, the bees appear to be very gentle. Gas prices alone put the lid on doing this again, but mileage aside, I wasn't exactly thrilled with this purchase. To begin with, when I ordered the nucs, they were supposed to be shipped in a heavy duty plastic reusable nuc box (retail ~$45). When I arrived to pick them up, they were in an inexpensive corrugated plastic nuc box (retail ~$9).  I intended to reuse the heavy duty boxes for swarm retrieval, so I was pretty disappointed in the use of the cheaper unit. I asked about the change up, and apparently, the heavy duty units were being shipped from Canada and after the shipping charges were factored in, a cheaper unit was the only way to go. Oh well...

What I thought I was getting...


What I got instead...
The nucs contained 4 frames, with the 5 frame location being occupied by a division board feeder. The feeders on both nucs were empty. Once I got a chance to transfer everything into my hive bodies, I found a few of the frames to be in pretty rough shape. The top wedge on one of the frames had warped to the point that it had pulled the nails out on one end, while another had a broken end bar. The comb looked a little old and had very little capped brood. Bees had chewed away the wax at the bottom and sides of a few of them, leaving only the frame wire holding the comb at the bottom and sides. There was probably a cup or more of dead bees per nuc, but to be fair, I had to pick the nucs up a day after the drop off because of my work schedule. All in all, I think I'd have been much better off buying packages instead.


No capped brood. Wax not attached at sides & bottom. Wedge bar separated. (Beeweaver Nuc)

Broken end bar (Beeweaver Nuc)

The Split
For those of you just joining us, I took the queen and 5 frames from a pretty strong hive and put them in a nuc at my house (My bee hives are kept elsewhere) a few weeks ago. The donor hive used medium frame supers for everything, so there were no deep or shallow supers. After a few days, I added a deep nuc box with 5 frames of foundation below the medium nuc box. The bees immediately began drawing the comb in the deep nuc and the queen started laying a nice pattern shortly after. Over the weekend, I decided that the population was strong enough to move them into a standard hive consisting of 1 deep hive body and one medium super. I haven't yet decided if I'll move the colony to one of the other bee yards or keep it at my house. Right now, it's in the flower bed in the front yard and I've had no complaints from neighbors, so we'll see how it goes. The donor hive was still queenless as of this past weekend. The virgin queen emerged on April 16th, so I expect her to be back in the hive by this weekend. Fingers crossed.

And last but not least, a very special thanks to the Fetching Mrs. T Bee for putting up with my travels, gallons of sticky sugar syrup made in our kitchen and using the table on our back deck for a pit stop for traveling nucs. A hobby without your best friend's support isn't much of a hobby.


If you'd like to be notified of updates to this blog, please email me at beeswax@teezbees.com. I promise your email address will not be shared with anyone.

 If you're interested in learning more about beekeeping, join a local beekeepers association as well as your state's beekeepers association. Explore your state's master beekeeper program if they have one. The following links can get you started:

U.S. State Beekeeping Clubs


South Carolina
South Carolina Beekeepers Association
Local Beekeepers Associations in South Carolina
South Carolina Master Beekeeper Program

Georgia
Georgia Beekeepers Association
Local Beekeepers Associations in Georgia
Georgia Master Beekeeper Program

North Carolina
North Carolina State Beekeepers Association
Local Beekeepers Associations in North Carolina
North Carolina Master Beekeeper Program

Thursday, April 7, 2011

Splitsville

I figured it was time to stir things up a bit, so I decided to split one of my hives. But it wasn't just because I couldn't leave well enough alone. In what appears to be something stripped from the annals of Bizzaro World, the weakest hive I had going into winter is now bursting at the seams, while my strongest hive is sucking wind. Ordinarily, I'd requeen the weak hive, but the only queens available in early April are in Hawaii and would cost me a bundle after shipping. So, I decided to let the bees do their thing and raise a queen for me.

For those who are unfamiliar, a split is the taking 4 or 5 frames of bees, brood (eggs, larvae & pupa), honey and pollen from a strong hive and putting them in an empty hive body or nuc box. If you don't have a new queen to introduce, whichever hive that is left "queenless" will instinctively begin raising a new queen within a few days.

I'm not going to pretend I'm some pro at splitting hives. I attempted it once and it failed because of mistakes on my part. And although I learned from those mistakes, I was understandably a little nervous about the possibility of fumbling a second time. As luck would have it, Jennifer Berry wrote the neatest little article on doing splits in this month's Bee Culture magazine, and after reading it, I was pretty pumped and ready for round two.


I planned to use a 5 frame nuc box to perform the split, but before I made the pilgrimage to the bee yard, I did a little prep; most of which was to prevent a truck cab full of angry bees from taking my eyes off the road. To begin with, I attached the bottom board to the nuc box with a couple of brackets I bought at Lowes. Next, I cut a piece of wood to block the entrance and secured it with a few thumb tacks. Then, I added a screened inner cover for ventilation. Finally, I rounded up an adjustable bungee cord to secure the inner cover so it wouldn't pop off coming down the road. With all my gear in check, I hit the road.

Bracket attaching the bottom board to the nuc for transport

Screened inner cover for ventilation

Entrance block held in place with tacks

Adjustable bungee cord. A truck cab full of angry bees wouldn't be good.
After a few puffs of smoke, I started taking the hive apart to find the frames suitable to my needs. When it comes to honey bees, I'm pretty good at two things: 1) I can usually find the queen, marked or not and 2) If I get stung, it's on the tenderest of spots. Guess which happened first?  Along about frame number three, an angry young lady decided to sting me on my index finger just behind my finger nail. So much for increased dexterity by not wearing gloves. It felt like I'd missed with the nail gun. I swear, I think she hit bone. Through gritted teeth I grunted as I scratched out the  rapidly emptying stinger, trying to shake it off. Now I know that an opposable thumb gives us an edge on the animal kingdom, but when it comes to manipulating frames in a bee hive, a pain free index finger is right up there with the thumb in my opinion. However, despite a throbbing digit, I found the queen a few frames later and whipped out my queen catcher, but in a continuance of the good luck, I ended up catching her in the jaws. Fortunately, I had the presence of mind to release the grip immediately, and she dropped out. Absent a 3rd hand and quickly beginning to panic, I put the frame back in the hive and began searching for her. My luck started to turn as I found her crawling around on the ground in front of the hive without stepping on her...yes I've done that before too. Breathing a sigh of relief, I snapped her up in the queen catcher and set her aside. Three stings later (knee cap seriously?!, elbow and forearm), I released the likely traumatized queen into the nuc and loaded it up in the truck.

Queen Catcher


Done!
 Everything went pretty smooth from there. It's a good idea to move a split several miles away so that foragers won't return to the wrong hive. So I put the nuc on a couple of blocks in the flower bed of my front yard (about 10 miles away from the donor hive) and dropped on one of my hive top feeders with some syrup and pollen substitute to reduce their stress levels. By that evening, everything seemed hunky dory as they were flying in and out their new home.


Newest addition to the flower bed
I plan on keeping the nuc at my house for several weeks. In the meantime, I'll be checking on the donor hive in a couple of days to see how they're coming along raising a new queen. Hopefully, they'll have a new momma by mid month. Stay tuned...