Monday, August 29, 2011

T Bee's Book Club


Several months back, while squandering time searching Amazon.com, I saw an advance publication notice for Kim Flottum's new book, Better Bee Keeping: The Ultimate Guide to Keeping Stronger Colonies and Healthier, More Productive Bees. Sadly, when someone includes words like "Ultimate", "Extreme" or "Ranch Flavored" in the name of their product, I'm drawn toward it like a moth to a flame. Further, since its subject would fit so well into my beekeeping library, I added Mr. Flottum's yet to be published work to my calendar so I could buy it as soon as it came out.
It's wrong, but I'd probably buy them...
For those of you who don't know, Kim Flottum has been the editor of Bee Culture Magazine for over 25 years. In addition to his latest book, he wrote The Backyard Beekeeper and The Backyard Beekeeper's Honey Handbook. He also has a electronic publication called Catch the Buzz that passes along the latest beekeeping news releases and articles via email a few times a week. So it's safe to say that when it comes to honey bees, Kim Knows his stuff.
Kim Flottum
On with the book review. I picked up my ultimate, extreme, to bad it wasn't ranch flavored copy of Better Beekeeping and got sucked in immediately. The reason being is that despite the generic title and vague endorsements, the book is written for those interested in the business of beekeeping. And since I'm in the process of launching my own little honey operation next spring, I was eager to see what ideas the book could add to my business plan. A lot was touched on, complete with tons of photos, but I'll focus on what my main takeaways were.


Time vs. Money

When it comes to building a beekeeping business, Mr. Flottum suggests approaching it with  the mindset of investing your capital in ways that allow for the best use of your time. I've learned the hard way how quickly I can get bogged down in the minutea of getting a business up and running, only to find out after the fact that outsourcing a lot of the details, even if I drew pride and satisfaction from them, would have been a more profitable use of my time. Further, taking on those non value added aspects become a bottleneck for growth. In beekeeping, it feels like time well spent to assemble hive bodies, supers and a few score of frames and foundation to run a couple of hives in the back yard. One may even call it fun. But when you're adding ten nucs, a half dozen packages and looking to do several splits on the twenty or so colonies you hope make it through winter, all those details can turn from satisfying joy to a loathsome chore. However, where reality and practicality cross paths, it can be hard to justify some expenditures. For instance, whereas I may strongly consider the added cost of buying pre-assembled frames and beeswax coated plastic foundation to free up time, I can't justify the investment in a chain uncapper. But I will say that Kim's philosophy reminds me that when entrepreneurial efforts consume all of your spare time, they start taking time away from other things you need or want to do. So it would seem important keep a sharp eye on how time is best spent.

Renting Land

Keeping bees can be a downright hassle, particularly if you live in an urban or suburban environment. Bees drinking out of neighborhood swimming pools, flying around flood lights at night, invading aluminum can recycle bins, meddlesome crumb snatchers hell bent on aggravating the bees with their water cannon do hickeys, overuse of pesticides and herbicides all make it tough to be both a good neighbor and a good beekeeper. So many of us go in search of bee yards away from all that stuff. And if we're lucky enough to find a secluded area not too far from home that doesn't cost us any money, we hit the trifecta. If there are good nectar and pollen sources close by or if there is a convenient water source, that's just icing on the cake. We're just happy to get to keep bees without being hassled, but more often than not end up with the bee yards we can get instead of the bee yards we want. Kim suggests seeking out the bee yards we want and approaching the owners about renting the land from them, maintaining that the increased production and decreased frustration yielded by the "perfect spot" will justify the cost. I think he's got a point and decided to pursue it. I've got several hives on a piece of property I own. It's a good area: secluded, lots of wildflowers, a few ponds around. However, the entire site is covered in pine trees, which provide too much shade; particularly when it comes to controlling small hive beetles. The piece of land that borders mine is a 20 acre field of broom straw that gets bush hogged once a year. So I sent the owner a letter expressing an interest in renting it. With that kind of acreage, I can move my hives out in the sun, have the land plowed and planted with what whatever nectar sources I want and have plenty of room to expand my number of colonies. For the owner, they don't have to maintain the field anymore and they get paid. Hopefully, they see it as a win/win too. Stay tuned...

Queen Rearing

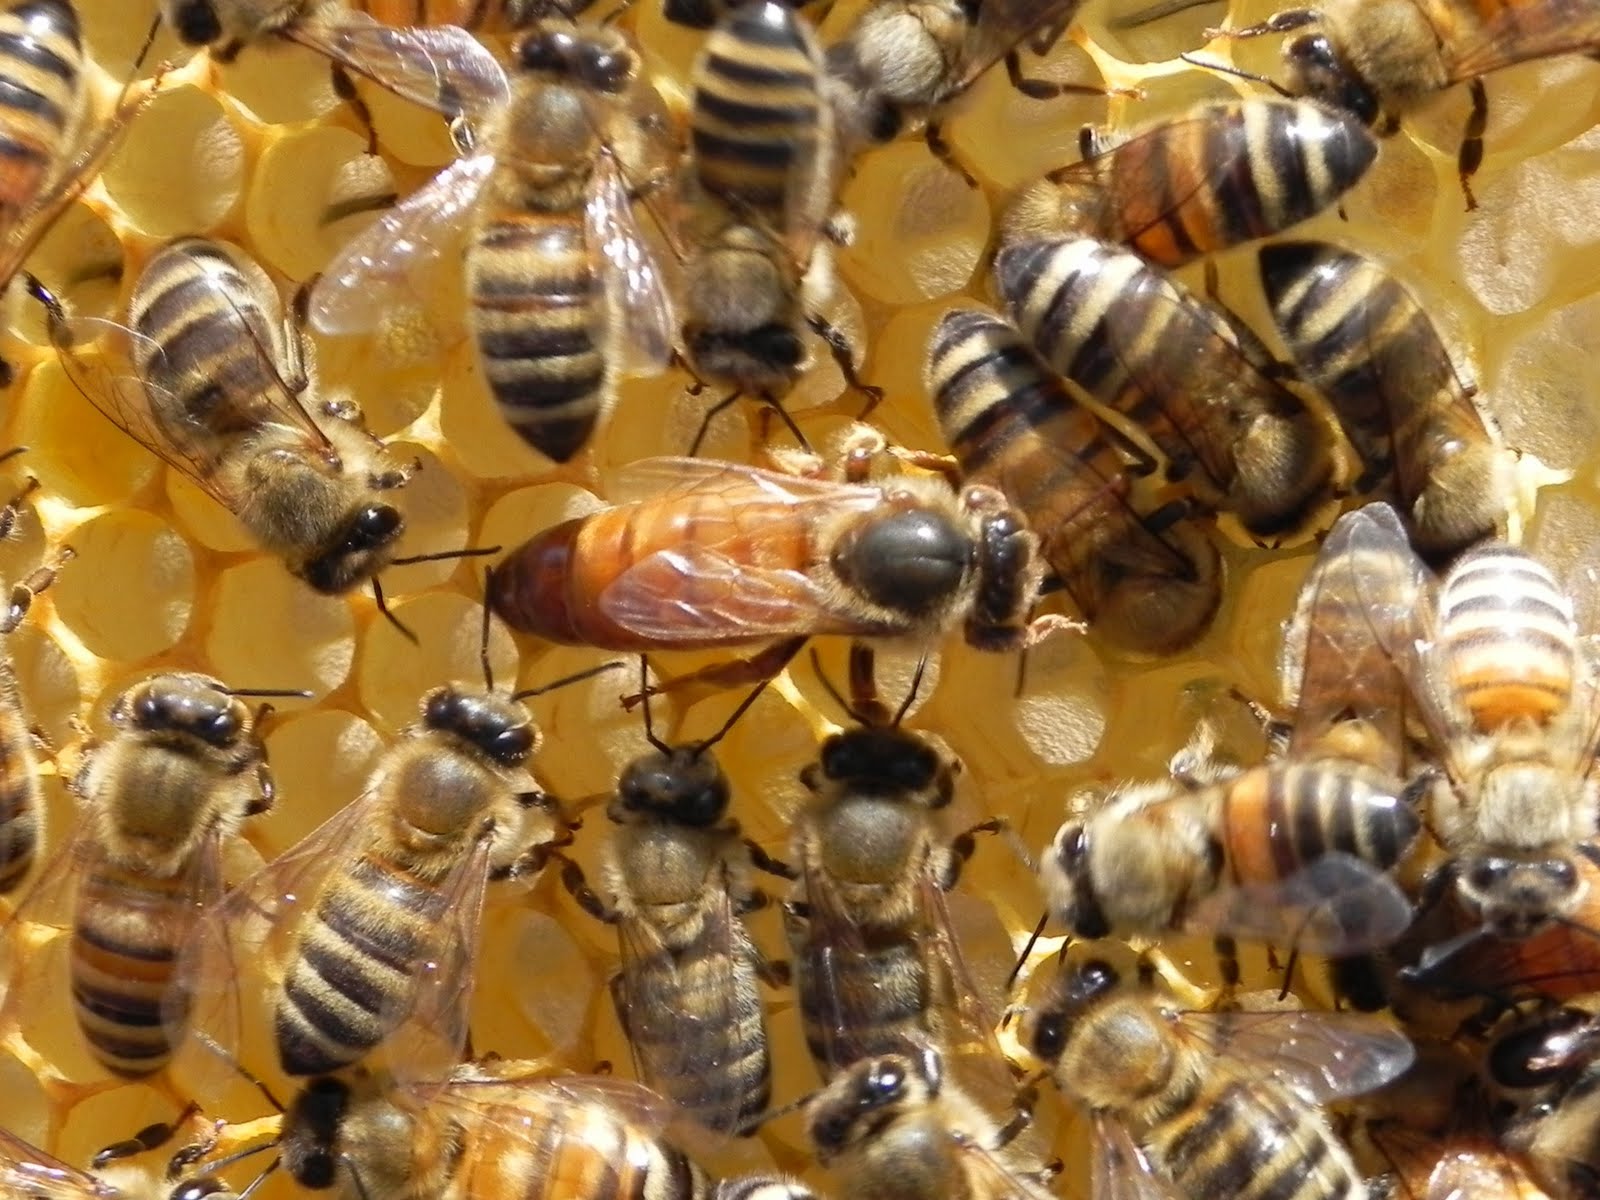
At our state beekeepers meeting this summer the overarching theme was queen rearing. Seminars and short courses on the subject were plentiful and well attended. No doubt, there's a big push for beekeepers to make raising queens part of their normal beekeeping tool kit, and in my opinion, this subject was given more detail than other topics in the book. Don't get me wrong. You won't be an expert on raising queens after reading this book, but you'll know enough about it to realize that it is far from easy. Much like settling for the land we can get, Kim purports we often settle for the queens we can get. Quoting a long time friend of his he theorizes that in a purchase of 10 queens, 2 will be dead or immediately superseded, 2 will produce progeny with above average honey yields while the other 6 produce progeny with an average honey yield. In other words, a normal bell curve: 20% outstanding; 20% below average; and the majority, so-so.

Only queen I've ever "raised". She's a great one, but
it appears it was dumb luck.
According to Kim, by raising your own queens and letting them spend about three weeks in a mating nuc to evaluate the brood pattern, you can make better queens (the queens you want) rather than settle for mass produced queens (the queens you can get). But for me, the book's focus on successful queen rearing felt like it was aimed at the large commercial operation. For instance, the concepts of investing in expensive breeder queens or instrumental insemination devices don't really fit in with making queens on a smaller scale. Further, the whole discussion took me back to the time versus money conflict, making it seem that finding a queen producer that consistently raises queens on the upper end of Kim's bell curve is a wiser use of my time and money; at least in the short run.

Conclusion

If you want to learn how to start beekeeping, Better Beekeeping isn't for you. However, if you're looking to start or expand your beekeeping business, this book would be worth buying. Although it isn't a detailed manual, it does give you a plethora of subjects on which further research may be beneficial to your business ventures.


If you'd like to be notified of updates to this blog, please email me at beeswax@teezbees.com. I promise your email address will not be shared with anyone.

 If you're interested in learning more about beekeeping, join a local beekeepers association as well as your state's beekeepers association. Explore your state's master beekeeper program if they have one. The following links can get you started:


South Carolina

Georgia

North Carolina

Monday, July 18, 2011

Four Splits and a Cup of Sugar

I got this e-mail last week from someone I'd never met. The title was, "Splitting Hives and Introducing New Queens Exercise" and was from Ralph "Buddy" May, a local Journeyman Beekeeper and owner of May Farms, LLC. Buddy was planning on doing some hive splits and introducing new queens and was willing to share with anyone interested. I'd just done a couple of splits of my own with mixed results and thought it would be a great idea to go observe someone with more experience, so I made plans to attend.

6 new queens from Gardner Apiaries


I made the high speed pilgrimage from work to Buddy's bee yard, making it there just in time to begin. We were going to split one colony comprised of two deep hive bodies into four 5-frame nucs. The hive in question was a poor performer with minimal honey production, so the plan was to pinch the old queen and put new queens in the 4 nucs. I'd always looked at splitting hives as a way to manage strong hives in order to increase the number of colonies I had, but I never really gave it much thought as a way to "reset" a poorly performing hive. However, this makes a lot of sense and I look forward to implementing this strategy in the near future.

Donor hive. Notice the two (empty) nucs on each side.
After a generous amount of smoke, Buddy set about distributing the frames in the donor hive into the empty nucs, making sure to position brood frames in the center and honey frames in the outer positions. He utilized screened bottom boards and screened inner covers. He also screened the entrance in order to keep the foragers from leaving and returning to the donor hive since he intended to leave the nucs in the same bee yard he split them from.

Puff, puff, puff
Honey super on top of donor hive
Brood frame from donor hive

After the frames were distributed among the nucs, a pollen patty was added to each nuc as well as a hive top feeder with a couple of quarts of 1:1 sugar syrup to reduce stress on the new colonies. Buddy decided to leave the nucs queenless for a day before adding the new queens. Further, since the queen from the donor hive, which was to be killed, was not located during the split, Buddy planned on going back through each nuc the next day to locate the queen. For requeening, Buddy uses a device called a queen ring, which fits between the nuc body and inner cover, allowing for enough space to insert the queen cage on top of the frames for the new queen's release. I've always introduced queens by suspending the cage on an empty frame, so I'd never seen a queen ring used, but I think this is a great idea.

Queen ring
After the nucs were done, Buddy showed the group how to do a "sugar roll" for detecting varroa mites. I'd heard of a similar technique called an "ether roll" whereby bees were collected in a jar and starter fluid (ether) was sprayed inside and the bees rolled around to dislodge the mites. The ether roll kills the bees while the sugar roll doesn't. To perform the sugar roll, a pint mason jar was filled about 1/4 with powdered sugar. The lid for the jar was replaced with a round piece of #8 hardware cloth and secured with the metal jar band. A sampling of bees was scooped up into the jar and the lid secured. Then the bees were rolled around in the sugar, which caused the mites to fall off of the bees in the jar.
Sugar roll
After the bees were rolled around a little, the jar was shaken out through the hardware cloth into a pan of water allowing the sugar to dissolve and the mites to be revealed. This is a great way to assess the level of varroa infestation to determine if the treatment threshold has been reached without killing a bunch of bees.
Shaking the sugar, and the mites, out.
It was quite an enjoyable evening and I really appreciated Buddy taking time to share his experiences with the group. Hopefully, he'll be doing some more hands on demonstrations in the near future.


If you'd like to be notified of updates to this blog, please email me at beeswax@teezbees.com. I promise your email address will not be shared with anyone.

 If you're interested in learning more about beekeeping, join a local beekeepers association as well as your state's beekeepers association. Explore your state's master beekeeper program if they have one. The following links can get you started:


South Carolina

Georgia

North Carolina

Friday, April 29, 2011

Busy With a Capital BEE

I've been busier than a one legged man in a a** kicking contest lately. In the last few weeks, I've traveled to Athens, Georgia to pick up 4 nucs from Jennifer Berry, then to Carthage, Tennessee to get a couple of nucs from Bee Weaver Apiaries, installed 3 packages in some new hives, split one hive, requeened another hive, mixed up and fed about 15 gallons of sugar syrup and put together a whole bunch of equipment. So how did it all go?

Nucs from Jennifer Berry
I couldn't be happier with this purchase. I only live about 2 hours from Athens, so the location is about as good as I could hope for. Further, Jennifer allowed me to bring the hive components down about a month early and she added 5 of her frames to each one a few weeks before I came to pick them up. So, the bees had already started drawing comb on the 5 frames of foundation I supplied. This was a big bonus. Once I got a chance to inspect them, I found a very nice brood pattern with lots of capped brood and lots of extremely gentle bees. They should be ready for a super in the next week or so. I'm definitely planning on ordering more nucs from Jennifer for next year.

A Berry's Bees "Peachy Queen"

Lots of capped brood underneath all these bees...

nom, nom, nom...

Package Bees
Last year, I worked out a deal with a friend of a friend to let me put some hives on his property which consists of a few acres of blueberries and another 60 acres of all sorts of good wildflower nectar sources like clover, vetch and blackberries. And best of all, he is vehemently against the use of pesticides and herbicides. In addition to my hives, he wanted to start some hives for his family if I'd be willing to help him get them started and share some of what I know. Of course, I was all too happy to oblige. It was way too late to order nucs, so I set about trying to find a source for some packages. Fortunately, a couple of members from my local beekeeping association worked out an arrangement with H&R Apiaries in Jessup, Georgia and I was able to order 3 packages through them. The members were able to go down to H&R to pick up a trailer load full of packages in the morning and bring them back to a local pick up site the same day. So by the time I picked up the three packages I ordered, the bees had been out of a hive less than 24 hours. I installed them by removing 5 frames from the hive body and placing the package in the open space to let the bees climb out on their own rather than dumping them out. When I pulled the empty packages out the next day, I had less than a 1/3 cup of dead bees between all three packages. I found the bees to be extremely gentle and started drawing out comb pretty quickly. The club members intend to do this again next year, so I'll probably get a few more next year.

Bzzzzzzzzzzzzzz

Nucs from Beeweaver
Back in the late 90's after I got out of college, I bought a few packages of Buckfast bees from R Weaver Apiaries in Navasota, Texas before Binford Weaver's family split off and started Beeweaver Apiaries. I liked them, but I felt that the long mailing from Texas to South Carolina was too stressful on the bees. So, when I saw that Beeweaver was doing a drop off program where they trucked packages and nucs from their location to various drop of sites across the country, I decided to give them a shot and pick up a couple of nucs from the closest drop site, which was in Tennessee. When I told people I was getting some nucs from Texas, warnings of the bees being Africanized were abundant. Fortunately, the bees appear to be very gentle. Gas prices alone put the lid on doing this again, but mileage aside, I wasn't exactly thrilled with this purchase. To begin with, when I ordered the nucs, they were supposed to be shipped in a heavy duty plastic reusable nuc box (retail ~$45). When I arrived to pick them up, they were in an inexpensive corrugated plastic nuc box (retail ~$9).  I intended to reuse the heavy duty boxes for swarm retrieval, so I was pretty disappointed in the use of the cheaper unit. I asked about the change up, and apparently, the heavy duty units were being shipped from Canada and after the shipping charges were factored in, a cheaper unit was the only way to go. Oh well...

What I thought I was getting...


What I got instead...
The nucs contained 4 frames, with the 5 frame location being occupied by a division board feeder. The feeders on both nucs were empty. Once I got a chance to transfer everything into my hive bodies, I found a few of the frames to be in pretty rough shape. The top wedge on one of the frames had warped to the point that it had pulled the nails out on one end, while another had a broken end bar. The comb looked a little old and had very little capped brood. Bees had chewed away the wax at the bottom and sides of a few of them, leaving only the frame wire holding the comb at the bottom and sides. There was probably a cup or more of dead bees per nuc, but to be fair, I had to pick the nucs up a day after the drop off because of my work schedule. All in all, I think I'd have been much better off buying packages instead.


No capped brood. Wax not attached at sides & bottom. Wedge bar separated. (Beeweaver Nuc)

Broken end bar (Beeweaver Nuc)

The Split
For those of you just joining us, I took the queen and 5 frames from a pretty strong hive and put them in a nuc at my house (My bee hives are kept elsewhere) a few weeks ago. The donor hive used medium frame supers for everything, so there were no deep or shallow supers. After a few days, I added a deep nuc box with 5 frames of foundation below the medium nuc box. The bees immediately began drawing the comb in the deep nuc and the queen started laying a nice pattern shortly after. Over the weekend, I decided that the population was strong enough to move them into a standard hive consisting of 1 deep hive body and one medium super. I haven't yet decided if I'll move the colony to one of the other bee yards or keep it at my house. Right now, it's in the flower bed in the front yard and I've had no complaints from neighbors, so we'll see how it goes. The donor hive was still queenless as of this past weekend. The virgin queen emerged on April 16th, so I expect her to be back in the hive by this weekend. Fingers crossed.

And last but not least, a very special thanks to the Fetching Mrs. T Bee for putting up with my travels, gallons of sticky sugar syrup made in our kitchen and using the table on our back deck for a pit stop for traveling nucs. A hobby without your best friend's support isn't much of a hobby.


If you'd like to be notified of updates to this blog, please email me at beeswax@teezbees.com. I promise your email address will not be shared with anyone.

 If you're interested in learning more about beekeeping, join a local beekeepers association as well as your state's beekeepers association. Explore your state's master beekeeper program if they have one. The following links can get you started:

U.S. State Beekeeping Clubs


South Carolina
South Carolina Beekeepers Association
Local Beekeepers Associations in South Carolina
South Carolina Master Beekeeper Program

Georgia
Georgia Beekeepers Association
Local Beekeepers Associations in Georgia
Georgia Master Beekeeper Program

North Carolina
North Carolina State Beekeepers Association
Local Beekeepers Associations in North Carolina
North Carolina Master Beekeeper Program

Thursday, April 7, 2011

Splitsville

I figured it was time to stir things up a bit, so I decided to split one of my hives. But it wasn't just because I couldn't leave well enough alone. In what appears to be something stripped from the annals of Bizzaro World, the weakest hive I had going into winter is now bursting at the seams, while my strongest hive is sucking wind. Ordinarily, I'd requeen the weak hive, but the only queens available in early April are in Hawaii and would cost me a bundle after shipping. So, I decided to let the bees do their thing and raise a queen for me.

For those who are unfamiliar, a split is the taking 4 or 5 frames of bees, brood (eggs, larvae & pupa), honey and pollen from a strong hive and putting them in an empty hive body or nuc box. If you don't have a new queen to introduce, whichever hive that is left "queenless" will instinctively begin raising a new queen within a few days.

I'm not going to pretend I'm some pro at splitting hives. I attempted it once and it failed because of mistakes on my part. And although I learned from those mistakes, I was understandably a little nervous about the possibility of fumbling a second time. As luck would have it, Jennifer Berry wrote the neatest little article on doing splits in this month's Bee Culture magazine, and after reading it, I was pretty pumped and ready for round two.


I planned to use a 5 frame nuc box to perform the split, but before I made the pilgrimage to the bee yard, I did a little prep; most of which was to prevent a truck cab full of angry bees from taking my eyes off the road. To begin with, I attached the bottom board to the nuc box with a couple of brackets I bought at Lowes. Next, I cut a piece of wood to block the entrance and secured it with a few thumb tacks. Then, I added a screened inner cover for ventilation. Finally, I rounded up an adjustable bungee cord to secure the inner cover so it wouldn't pop off coming down the road. With all my gear in check, I hit the road.

Bracket attaching the bottom board to the nuc for transport

Screened inner cover for ventilation

Entrance block held in place with tacks

Adjustable bungee cord. A truck cab full of angry bees wouldn't be good.
After a few puffs of smoke, I started taking the hive apart to find the frames suitable to my needs. When it comes to honey bees, I'm pretty good at two things: 1) I can usually find the queen, marked or not and 2) If I get stung, it's on the tenderest of spots. Guess which happened first?  Along about frame number three, an angry young lady decided to sting me on my index finger just behind my finger nail. So much for increased dexterity by not wearing gloves. It felt like I'd missed with the nail gun. I swear, I think she hit bone. Through gritted teeth I grunted as I scratched out the  rapidly emptying stinger, trying to shake it off. Now I know that an opposable thumb gives us an edge on the animal kingdom, but when it comes to manipulating frames in a bee hive, a pain free index finger is right up there with the thumb in my opinion. However, despite a throbbing digit, I found the queen a few frames later and whipped out my queen catcher, but in a continuance of the good luck, I ended up catching her in the jaws. Fortunately, I had the presence of mind to release the grip immediately, and she dropped out. Absent a 3rd hand and quickly beginning to panic, I put the frame back in the hive and began searching for her. My luck started to turn as I found her crawling around on the ground in front of the hive without stepping on her...yes I've done that before too. Breathing a sigh of relief, I snapped her up in the queen catcher and set her aside. Three stings later (knee cap seriously?!, elbow and forearm), I released the likely traumatized queen into the nuc and loaded it up in the truck.

Queen Catcher


Done!
 Everything went pretty smooth from there. It's a good idea to move a split several miles away so that foragers won't return to the wrong hive. So I put the nuc on a couple of blocks in the flower bed of my front yard (about 10 miles away from the donor hive) and dropped on one of my hive top feeders with some syrup and pollen substitute to reduce their stress levels. By that evening, everything seemed hunky dory as they were flying in and out their new home.


Newest addition to the flower bed
I plan on keeping the nuc at my house for several weeks. In the meantime, I'll be checking on the donor hive in a couple of days to see how they're coming along raising a new queen. Hopefully, they'll have a new momma by mid month. Stay tuned...

Monday, March 28, 2011

Inspector Gadget

Despite being told that I have a freakishly good memory, I still have trouble remembering things. You know, like failing to get that 5th item I was supposed to pick up at the grocery store, or forgetting to get up early enough to gas up my car on the way to work. Tinkering with a bee hive is no different for me. I can make make mental notes about all sorts of observations and to-do items only to realize the next time I pop the lid that I forgot something. It's especially frustrating when the forgotten tidbit would have required me to bring something extra to the bee yard since my bees have to be kept away from my home on account of I live in suburbia hell and meddling little crumb snatchers and whiny pantie waist HOA clowns don't mix well with the honey bees and me. Rant over. One might say I should take notes. Great idea, but a notebook is usually the one thing I can count on forgetting when going out to check on the bees. Plus, my chicken scratch isn't very legible at a comfortable desk, let alone standing in the hot sun with bees buzzing around.

One day while browsing some message boards, I stumbled across a free web based tool called Hive Tracks that beekeepers could use to keep records on what's going on amongst their bees. It was developed by a couple of computer gurus in Western North Carolina who also happen to keep bees.


The software allows you to set up multiple bee yards and even uses the address of the yard to fill in the GPS coordinates and the weather conditions. I don't use the weather feature because I use Hive Tracks' handy paper form to record my inspections to input on the website later. So, I usually just hit The Weather Channel's website on my Blackberry when I get to the bee yard to lock in the time and weather information so I don't have to estimate when I do my updates.


One of the neatest features I've found is the hive builder tool, which allows the user to construct a graphical representation of all of the components that make up a particular hive. It also allows you to change the construction of individual hives as you add or take away components during the year.


You can also keep records about the queen that is inside each hive including her race, the marking color (if any), date she was installed and any comments about her.


It's a pretty cool gadget, no doubt. I'm still struggling to remember to carry along my clipboard full of blank inspection forms, but I'm trying. If I can stay disciplined in using it, I'm hoping that it will provide me with data on what factors made things within particular hives go right or go wrong so that I can duplicate successes and hopefully avoid failures. If you keep bees, I'd encourage you to visit the Hive Tracks site and see what you think.


If you'd like to be notified of updates to this blog, please email me at beeswax@teezbees.com. I promise your email address will not be shared with anyone.

If you're interested in learning more about beekeeping, join a local beekeepers association as well as your state's beekeepers association. Explore your state's master beekeeper program if they have one. The following links can get you started:

U.S. State Beekeeping Clubs


South Carolina
South Carolina Beekeepers Association
Local Beekeepers Associations in South Carolina
South Carolina Master Beekeeper Program

Georgia
Georgia Beekeepers Association
Local Beekeepers Associations in Georgia
Georgia Master Beekeeper Program

North Carolina
North Carolina State Beekeepers Association
Local Beekeepers Associations in North Carolina
North Carolina Master Beekeeper Program

Monday, March 14, 2011

Bee-moaning Beetles

I hate beetles. Whether it was being forced to scatter a nylon stocking full of Sevin Dust as a child to kill Japanese Beetles, or, as a teen, feverishly pumping the brakes to stop my '72 VW Beetle...they've plagued me my entire life. These days, the only beetle that's got me up nights is the dreaded small hive beetle (SHB). This nemesis to the honey bee is so tormenting that I'm convinced that if Pharoh hadn't thrown in the towel, the SHB would have been the 8th plague. These little miscreants decided to pick a fight with me last year when they destroyed a nucleus hive that I started. Then, they doubled down when they took over a hive that I bought from an apparent hoarder (see The Worst $260 I Ever Spent). I'd say they've thrown down the gauntlet.


Small Hive Beetle Larvae Infestation

What Are These Things?
Small hive beetles are native to Africa, and first made it to the shores of the US in 1996. Like many hive predators, they fly directly into the hive entrance, but due to their small size & hard shell, guard bees are unable to kill or expel them from the hive. Don't get me wrong, a strong hive can keep them on the run and pretty much deal with them, but a weak hive or a hive without enough bees to cover all of the comb can be destroyed quickly. The beetles themselves aren't the issue. It's their larvae that is so destructive. A female beetle will gain entry to the hive and if given the opportunity, will lay her eggs in cells of uncapped honey. Once the eggs hatch, the larvae feed on the honey and then...well, they dootie in it (I just said dootie). This unsavory act causes the honey to ferment faster than Popcorn Sutton's (R.I.P.) mash and begin oozing out of the hive. Then the larvae exit the hive and burrow in the ground to begin their metamorphosis into an adult beetle to begin the cycle again. Understandably, the bees will reject the hive and abscond in search of another home if this happens.


How do you get the upper hand?
As was common beekeeping practice, the use of approved chemical pesticides inside and outside the hive was the initial method prescribed for controlling the beetles (there are other more aggressive treatments that I won't go into because I think they are grossly irresponsible). However, more and more, the beekeeping community is abandoning chemical treatment as the initial form of pest control in favor of integrated pest management (IPM). IPM has a goal of significantly reducing or eliminating the use of pesticides while at the same time managing pest populations to an acceptable level. In beekeeping, choosing strains of bees with genetic resistance to certain pests and disease and the use of nontoxic substances to keep pests below treatment threshold levels are methods of implementing IPM. Only after a treatment threshold is reached, are chemical treatments used in order to save the colony from collapse. I like this line of thinking because if at all possible, I don't want any substance inside my bees' bodies that I wouldn't want in mine. So for me, chemical treatments have no place inside my hives unless the colony's survival depends on it.
Albeit satisfying, a thumb pressed firmly against the body of a small hive beetle until it is squashed as flat as a pancake while screaming, "Die you damn dirty beetle!!!" isn't the most efficient form of IPM. Rather, the use of traps containing vegetable oil have shown the most promise in dealing with them. The most effective traps have been those which utilize a screened bottom board with either #8 or #6 galvanized hardware cloth with a tray of vegetable oil underneath. As beetles are chased by guard bees, they fall through the screen and into the oil where they die. Some research suggests that used vegetable oil also serves as an attractant to the beetles, but it also attracts scavengers like skunks who love the nummy left over fish fry or tater tot oil. I don't currently use oil pan traps, but I plan to do so this year.


Freeman Beetle Trap from Ashley Bee Supply
 There are also a few traps used inside the hive. The Hood Trap, developed by Dr. Mike Hood of Clemson University, uses a 3 chambered container attached to an empty frame. The two outer chambers are filled with vegetable or mineral oil and the center chamber is filled with cider vinegar as a means to attract the beetles to the trap. Then there are the traps that fit between the frames. These include the Cutt's Beetle Blaster (warning: site contains music), AJ's Beetle Eater, and the Beetle Jail Jr. I personally prefer the Beetle Jail Jr. because it incorporates the three chamber design that the Hood Trap does without using up a frame space.


Beetle Jail Jr.
 But above all, a strong colony is the best first line of defense against the small hive beetle. However, I think strong colonies benefit from using the traps. I mean, I'd rather have bees making honey rather than chasing and cleaning up after beetles. But if you live in an area where small hive beetles are prevalent and have a weak hive or possibly a newly established nuc, do yourself a favor and invest in some type of beetle trap to give the bees all the help you can in defending against these aggravating little twerps.

If you'd like to be notified of updates to this blog, please email me at beeswax@teezbees.com. I promise your email address will not be shared with anyone.

 If you're interested in learning more about beekeeping, join a local beekeepers association as well as your state's beekeepers association. Explore your state's master beekeeper program if they have one. The following links can get you started:

U.S. State Beekeeping Clubs


South Carolina
South Carolina Beekeepers Association
Local Beekeepers Associations in South Carolina
South Carolina Master Beekeeper Program

Georgia
Georgia Beekeepers Association
Local Beekeepers Associations in Georgia
Georgia Master Beekeeper Program

North Carolina
North Carolina State Beekeepers Association
Local Beekeepers Associations in North Carolina
North Carolina Master Beekeeper Program

Saturday, March 5, 2011

It's Only Money

The other day, I stumbled across a couple of A.I. Root catalogs from the 1950's that a friend gave to me a few years ago. Since I just dropped a small fortune in beekeeping stuff from a couple of different suppliers, I thought I'd flip through the old catalogs and do some comparisons to see how prices stack up vs. today.


"This is way more neato than a hula hoop! Thanks mom and dad!!

"Hey Beave. How about taking those gloves off and fetching dear old dad a scotch..."

I decided to make a short list of items from the 1957 catalog that are still used today, adjust those prices for inflation, then compare to today to see if the cost of beekeeping had outpaced or lagged inflation. For my inflation figures, I used the CPI Inflation Calculator comparing 1957 to 2011 (2010 data). For the current suppliers, I used Brushy Mountain Bee Farm, Walter T Kelley Company, and Rossman Apiaries as well as current rates for Bee Culture magazine which is still published by A.I. Root. The results were interesting.

Click to enlarge


The data shows that prices for package bees and queens have outpaced inflation while the basic equipment for beekeeping has lagged inflation. Sad, but not surprising, shipping for package bees has not only outpaced inflation , but has realized the highest percentage increase of all items tested...yeah, go figure. 

So bees cost more and equipment costs less, but why? Price elasticity aside, my first instinct is to say that modern manufacturing technology has resulted in a lower cost for producing wooden ware such as frames and hive bodies. As a result, I'd give technology a pat on the back for going easy on my pocketbook. On the other hand, it's more expensive to buy the little critters than it should be. I suppose it could diseases and pests that weren't around in 1957, supply/demand, higher cost for land, insurance, or maybe raising bees to sell is just more profitable than it used to be. And why is shipping so high? US Postal Service rate hikes, or shippers like UPS beginning to handle bees maybe?

Inflationary trends aside, getting into beekeeping is probably no more cost prohibitive today than it was in the 1950's. And if you have some common tools and skills, you can construct a lot of your own equipment, offsetting some of your cost. Can't do that with scuba diving, bungee jumping, or reloading ammo...trust me. Further, once you get up and running, you can sell a portion of your harvest; particularly to those with allergies and health conscious folks who are seemingly always searching for a source of raw local honey.

But the sweet stuff aside, the calming effect that observing these fascinating little creatures has is worth a few bucks if you ask me. Whether you're crouched to the side watching workers returning with sacks full of pollen, or standing in the hot summer sun carefully scanning a frame full of scurrying bees, it's a state of relaxation that's right up there with a Pawleys Island Hammock on the beach. For a brief moment, it takes me back to a time when my life was simple, and I didn't have a care in the world; like the cover photos of these old catalogs. A time when the lack of responsibilities caused me to take for granted the sheer joy of being out in nature. If you're a beekeeper, you probably know what I'm talking about. If you're not, I encourage you to find out for yourself. It's well worth it.


If you'd like to be notified of updates to this blog, please email me at beeswax@teezbees.com. I promise your email address will not be shared with anyone.

 If you're interested in learning more about beekeeping, join a local beekeepers association as well as your state's beekeepers association. Explore your state's master beekeeper program if they have one. The following links can get you started:

U.S. State Beekeeping Clubs


South Carolina
South Carolina Beekeepers Association
Local Beekeepers Associations in South Carolina
South Carolina Master Beekeeper Program

Georgia
Georgia Beekeepers Association
Local Beekeepers Associations in Georgia
Georgia Master Beekeeper Program

North Carolina
North Carolina State Beekeepers Association
Local Beekeepers Associations in North Carolina
North Carolina Master Beekeeper Program

Friday, February 25, 2011

If All Else Fails, Read Instructions

My first interaction with honey bees was in the summer of 1984. I was only 9 years old, but I remember the day vividly because it was the first time my dad inspected my grandfather's hives. Up to then, my grandfather was the only family member who fooled with bees, and after his death my father showed an interest in tending them.

Papa's bee suit consisted of a pair of dark grey coveralls, a drawstring veil, a mesh ventilated helmet and some work gloves. My dad was bigger than him, therefore, the only things that really fit were the gloves, helmet and veil. So the other parts of his make shift suit consisted of one of those heavy old school black coats with a big fur collar, work boots and a lot of duct tape. Whatever he lacked in knowledge about working a hive of bees, he made up for in fortitude as he stomped down toward "The Branch" (stream) where Papa's three hives were set up; the whole family watching with pride and anticipation.

About 20 minutes later, my father emerged from the right side of the tractor shed, staggering and flogging at bees who were feverishly attacking him. Many of them had managed to enter his veil, stinging him across his back and shoulders. Others had gotten into his boots and stung him severely on both of his ankles. All total, my mom counted 64 stings. There wasn't much doubt; Papa's Bees 1, Pop zero.

After he healed up, my dad bought several books on beekeeping. Among them were, The Hive and the Honey Bee, the bible of beekeeping, The ABC and XYZ of Bee Culture, and Walter T Kelley's classic, How to Keep Bees and Sell Honey.

Al Gore hadn't gotten around to inventing the internet in 1984, so in addition to books, my dad read two beekeeping magazines which are still popular today: American Bee Journal and Bee Culture. Within the pages of these books and periodicals, he learned, among other things, that bees do not respond well to dark colors or heavy fragrances. So his hulking furry black coat and Aramis didn't do much to keep things copacetic.


Bad Idea
Now a days, in addition to new and timeless classic books, DVD's and a handful of magazines there are online forums like Beemaster and Beesource, manufacturer's websites like Brushy Mountain, Mann Lake and Walter T Kelley (most of which have fan pages on Facebook), and countless blogs like The Backwards Beekeepers, John Pluta's Georgia Bees, Blakeney Bees and of course Buzzed and Confused ;). Then there's YouTube, Wikipedia and apiary websites...the list of resources available online goes on and on. Further, there are scores of state and local beekeeping associations full of knowledgeable folks willing and ready to share what they have learned. Yep, these days, you can just about enjoy the hobby of beekeeping vicariously without even so much as popping the top on a hive. But how much fun would that be?

So the moral of this story is to learn all you can before jumping in. Read, ask, listen and observe. Join an association. Read the forums. Buy some books. Follow some blogs. And when you feel comfortable, consider establishing a hive or two. You'll be glad you did.

Epilogue
In the years that followed, Papa's hives were washed away when the branch got out of its banks during a heavy storm, but my dad would end up learning quite a bit about how to keep honey bees; passing off a bit of his knowledge to me. He would go on to establish new hives at our home, where as a teen, I would carefully walk up on hot summer days and watch "beards" of bees hanging on the outside of the hive. And, as fate would have it, 14 years after my dad's woeful first inspection, I would find myself sitting alone eating breakfast in Schilletter dining hall at Clemson University with my nose buried in his tattered copy of How to Keep Bees and Sell Honey, biding my time until I had a job and a paycheck so I could get started on my own trials and tribulations with this curious and fascinating little insect.

TB

If you'd like to be notified of updates to this blog, please email me at beeswax@teezbees.com. I promise your email address will not be shared with anyone.

 If you're interested in learning more about beekeeping, join a local beekeepers association as well as your state's beekeepers association. Explore your state's master beekeeper program if they have one. The following links can get you started:

U.S. State Beekeeping Clubs


South Carolina
South Carolina Beekeepers Association
Local Beekeepers Associations in South Carolina
South Carolina Master Beekeeper Program

Georgia
Georgia Beekeepers Association
Local Beekeepers Associations in Georgia
Georgia Master Beekeeper Program

North Carolina
North Carolina State Beekeepers Association
Local Beekeepers Associations in North Carolina
North Carolina Master Beekeeper Program

Saturday, February 19, 2011

Fat Dumb and Happy

Drone - (drohn) - n. - 1. The male of the honey bee and other bees. 2. a remote control mechanism, as a radio controlled airplane or boat. 3. a parasitic loafer.

Have you ever known that good for nothing, lazy bum that just laid around all day watching Jerry Springer and gobbling up Oreos, only getting off his dead a** to harass his better half for a little action? Well, the drone is the beehive's version of this clown. A drone doesn't have a stinger. A drone has no job within the colony. He doesn't gather nectar or pollen, nor does he make honey or help keep the hive clean. All he does inside the hive is eat. 


Delicious Honey- nom, nom, nom

A drone exists for one reason and one reason only...to mate, but mating does not occur inside the hive. Rather, in the afternoons, drones from many colonies fly to drone congregation areas to wait on virgin queens to show up to attempt to mate with; sort of like a honey bee version of a frat party. When a queen shows up, a frenzied chase begins in what is known as a mating flight where as many as 20 drones will successfully mate with a single queen. I guess her flight back to the hive could be called the "flight of shame".

Now, you  may think that laying around all day eating and then heading out for a night on the town to get with the ladies sounds pretty good; and I agree wholeheartedly. However, before you wish you could be a drone in your next life, you should know there are some drawbacks. First of all, every fall, the worker bees (who are all female by the way) in a necessary measure for winter survival of the colony, beat the hell out of the drones and throw them out of the hive where they starve to death. Sounds kind of like something from an episode of Cops doesn't it? Secondly, a drone can only successfully mate once, and it's not because he loses his mojo. Instead, after the "lucky" drone completes his mating ritual, his "equipment" is ripped from his body. Um...kinda harsh.

Despite only comprising around 1% of the hive's population, drones are pretty easy to recognize. For one, they are larger than worker bees; probably from all that honey they've been munching on. Also, they have big goofy eyes, which aid them in spotting queens during mating flights. Biologically, a drone will develop from an unfertilized egg and will emerge from it's cell 24 days after the egg is laid. From a honey production and hive management standpoint, drones are worthless. However, the existence of drones is beneficial for integrated pest management in combating the varroa mite, a parasitic mite that attacks honey bees. Varroa reproduce within the brood chamber of the hive, by laying their eggs on the bodies of developing bees. Varroa prefer developing drones because their developmental period is longer than that of worker bees (24 days vs 21 days). One way of attempting to control varroa is to purposely allow a frame of drones to be raised by using special beeswax foundation with drone sized cells (drone cells are larger). After the cells are capped during the final stage of the drone's development, the beekeeper removes the drone frame and freezes it. The drones are killed, but so are the mites.

And there you have it. The fat dumb and happy drone. Next time, I'll give you some insight into the queen bee.


If you'd like to be notified of updates to this blog, please email me at beeswax@teezbees.com. I promise your email address will not be shared with anyone.

 If you're interested in learning more about beekeeping, join a local beekeepers association as well as your state's beekeepers association. Explore your state's master beekeeper program if they have one. The following links can get you started:

U.S. State Beekeeping Clubs


South Carolina
South Carolina Beekeepers Association
Local Beekeepers Associations in South Carolina
South Carolina Master Beekeeper Program

Georgia
Georgia Beekeepers Association
Local Beekeepers Associations in Georgia
Georgia Master Beekeeper Program

North Carolina
North Carolina State Beekeepers Association
Local Beekeepers Associations in North Carolina
North Carolina Master Beekeeper Program